Admin Panel
Creating New Admin Panel User Accounts
Managing Admin User Permissions
Resetting Your Admin Panel Password
Signing Into the Admin Panel
Analytics
Using the Engagement Analytics Report
Using The Website Analytics Report
Using the Peer Benchmarking Report
Tips to Improve Your Site's Search Engine Optimization
The Visitor Acquisition Dashboard
The Consent Management Service
Setting Up Google Conversion Tracking for Dealer Spike Forms
Using the New Reputation Management Console
Basic DNS Information for Your Website & Email Domain
Changing Metadata through the inline editor
Important Analytics and SEO Terms and What They Mean for Your Site
Content Editing
New Certified Partner Program Announcement
Image Guidelines and Tips
Using Built-in Web Forms and Leads
Adding OEM Promotions to Your Website
Updating Slideshows (Rotating Banners)
Creating Modal Pop-Ups with the Announcement Builder
Create Content Pages
Using Basic HTML to Format Text in Inventory Fields and Content Snippets
Managing Staff with the Staff Builder Tool
Changing the About Us Statement on the Home Page
Creating Calendar Events
Customizing Page URLs
Creating Blog Posts
Tips and Tricks for Laying Out Pages
Changing Hours with the Hours Editor
Managing Announcement Pop-Up Templates
DMS Integrations
Integration Details for Dealers with a Talon DMS
DMS Integrations Overview (Incoming Feeds)
How to Prepare for your DMS Integration
Integration Details for Dealers with Lightspeed DMS
SKU Availability
Inventory Trim Matching Guide
How to Turn off Inventory Fields from Updating Nightly
DMS Integration Frequently Asked Questions
Getting Started with DMS Integrations
Integration Details for Dealers with an AutoMate DMS
How to Manage your Talon DMS Integration
Dealer Spike Information
Contacting Technical Support
Getting in Touch with Your Account Manager
Am I on the Right Help Center?
Getting Started
Third Party Partner Program Script Guidelines
Changing Your Billing Information
Getting News and Updates about Dealer Spike
Ecommerce
Catalog and Product Management
Aftermarket Catalog and Product Management
Parts Finder OEM Catalogs
Bulk Update OEM Part Prices
Parts Finder OEM Price Uploads
Parts Finder OEM Catalog Availability
Where Can I Manage Parts Finder OEM Parts?
Edit Single Parts Finder Parts
Private Catalog and Product Management
Update Private Catalog Products and Product Groups by User Interface
Examples of Product Data and Attributes
Update Private Catalog Products and Product Groups by CSV Import
What Should I Know Before Starting a Private Catalog?
Update Fitment by User Interface
Export Ecommerce Products and Product Groups to CSV
Update Fitment by CSV Import
How do I Create and Publish Private/Custom Catalogs?
Delete Products
Ecommerce Products, Product Groups, Categories and Catalogs
Update Categories and Category Structure by CSV Import
Update Price Overrides by CSV Import
Hide or Show Ecommerce Product Groups and Categories
Update Image Overrides by CSV Import
Update Cost Overrides by CSV Import
Update Shelf Inventory and Price by User Interface
Update Categories and Category Structure by User Interface
How to Format an Ecommerce SKU for Imports
Hosting Visuals in Media Center
Set Sales on Ecommerce Products
Update Shelf Inventory and Sale Price by CSV Import
Creating Ecommerce Feature Groups
Update Price Rules & Price Overrides by User Interface
Delete or Exclude a Product Group
Update Product Group Category Mapping by User Interface
Update Product Group Category Mapping by CSV Import
Ecommerce Checkout Process and Orders
How do I Fulfill In-Store Pickup Orders?
Create Coupon Codes
How to Charge Shipping
Configure In-Store Pickup
Orders Overview
Configure Shipping
EasyPost - Feature Summary and Set-up
How to Configure Paypal for Checkout
How to configure Authorize.net for checkout
How to configure Stripe for checkout
Lightspeed Web Orders Module
Order Automation
How to Buy Postage
Getting Started with Ecommerce
Ecommerce Terms and Functions
FAQs
What is the New Webstore Landing Page for Ecommerce?
Ecommerce Setup Checklist and Troubleshooting
Webstore Settings
Configure Inventory Rules
General Account Settings
Accessing Ecommerce
File Center Import and Export Hub
Other Integrations
Email Administration
Inventory
Changing Inventory Prices
Filtering & Sorting Inventory
Getting the Dealer Spike Mobile App
Using the Dealer Spike Mobile App
Enhance Digital Retailing with Payment Genie
How to Add a Sale Price to Inventory Listings
Dealerpic360 User Guide
Add and Remove Inventory Units
How to Troubleshoot Duplicate Inventory Units on your Dealer Spike Website
Managing Stock Photos on Inventory Units
About The Vehicle Detail Page
Protecting Manual Changes to your Major Inventory Units
Clearance, Consignment, and Custom Inventory
Adding Youtube Videos to Inventory Units
What to Do If Your Inventory Isn't Updating
Tips on Troubleshooting VIN Issues
Sold Inventory Units Still Showing on Website
Managing Rental Inventory
Exporting / Printing Out Your Inventory
Adding Overlay Text to Inventory Units
Managing Featured Inventory
Managing Multi-Location and Multi-Site Inventory
Managing Inventory Display Order
Recently Viewed Inventory
Adding Units that Aren't in the Vehicle Database
How to Edit/Update Inventory Units in the Inventory Manager
Leads
Using Lead Hunter
Tips for Managing Leads to Increase Sales
Leads Manager
Change Lead Email Settings
Approving and Rejecting User Surveys and Testimonials
Printing Finance App Leads
Exporting Leads
Marketing
Understanding Your Automated Email Marketing (AEM) Campaigns & Metrics
Add Dealer Spike as a Google Business Profile Manager
Newsletter
Log into the Dealerspike Newsletter tool
Resetting Your Newsletter Password
Creating a Newsletter
Importing an Audience List into the Newsletter Tool
Exporting Newsletter Contacts to a CSV File
Outbound Feeds and Syndications
- All Categories
- Ecommerce
- Ecommerce Checkout Process and Orders
- Order Automation
Order Automation
Drop-Shipping vs Order Automation.
There is some confusion out there in regards to what these are.
Traditional Drop-Shipping is the process of manually placing an order with the distributor, manually sending the buyer tracking, and having the order shipped directly to the buyer. Our standard system allows you to do that by letting you advertise a 1 day lead time. You just need to place the order with the distributor and get tracking to the buyer.
Order Automation is an advanced feature that allows you to place an order directly from our system, tracking is automatically sent to the buyer, the order is shipped directly to the buyer. It simply automates the drop-shipping process.
Feature Summary
The E-Commerce Configuration gives you the ability to place orders directly with the Aftermarket distributors. You will still need to acknowledge the order in the E-Commerce Configuration and confirm that you want to place the order for drop ship, but it removes the need to place the order directly within the distributor’s online backend. Additionally, the system will automatically pull in the tracking information from the distributor and send it to the buyer.
Distributors available: Western Powersports, Tucker Rocky, Parts Unlimited, Automatic.
Step 1 - Reach out to your distributor reps
You will need to contact each distributor that you wish to set up with and request credentials to use their automation service. The information that you will need for each distributor is listed below.
Parts Unlimited
- Dealer Number
- API Key
Tucker Rocky
- Customer Number
- API Key
Your Tucker Rocky account must be configured with a credit card before items may be successfully submitted and drop-shipped.
Western Powersports
- API Token
- Dependency - Your WPS account must be configured with a Tax ID before items may be drop-shipped.
Automatic
- API Token
Step 2 - Enter Credentials into the E-Commerce Configuration
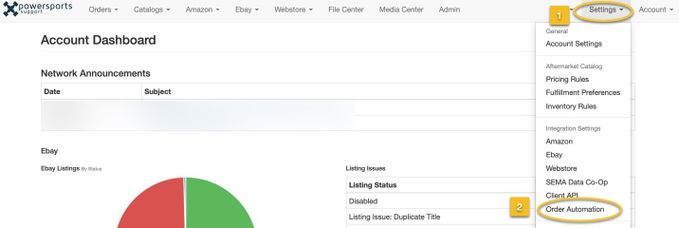
Settings > Order Automation
Once you get the above information you will need to enter it into the system.
Step 3 - Confirm Your Inventory Rules
Settings > Inventory Rules
The one key to remember is that for this feature to function, your Inventory Rules must be configured in a way that supports drop-shipping. You must have warehouses and products configured so that they support a 1 day lead time. Anything with a lead time greater than 1 is considered non-dropshipable.
If you just want it configured to drop-ship everything, set all of your drop-ship cutoffs to $1.00 and Lead Times to 1 Day. Done.
Step 4 - Place Orders
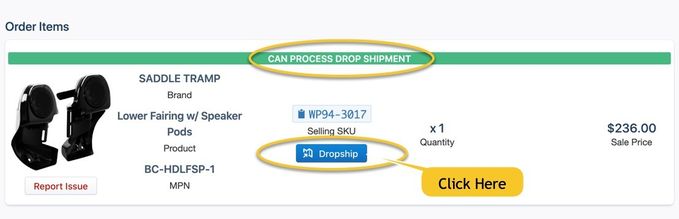
- From the main navigation of the dashboard, proceed to the Orders Module and click "View" on an order that qualifies for drop-ship.
- Review the order and scroll down to the Order Items area at the bottom of the page. Click the blue Dropship button.
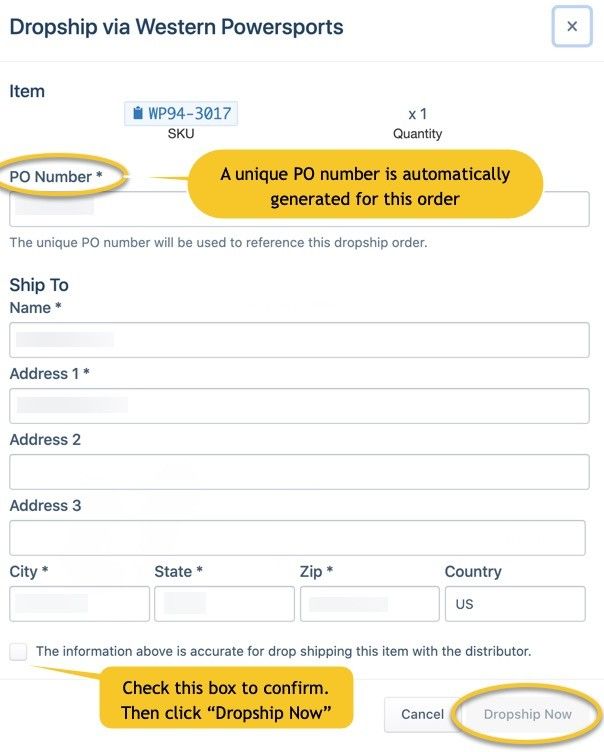
- Confirm the order information and complete the dropship.
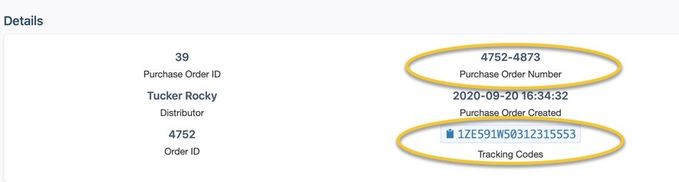
Step 5 - Track Purchase Orders
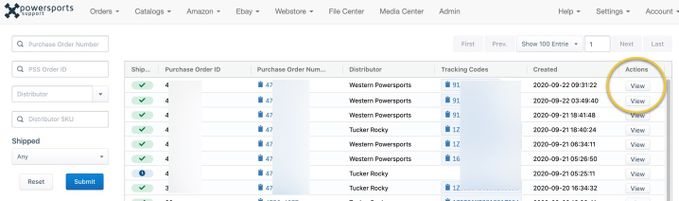
Orders > Purchase Orders
The purchase orders are automatically created in the system for each new drop-ship order. You can track all of your dropshipped purchase orders from the Purchase Orders Page.

Here you can search by a purchase order number, order id, distributor, or shipped status. Additionally, you can click "View" on the right-hand side of an order line item and get tracking information.
Here is the Order Details View w/ tracking
Feature Note - SKU Swapping
In the event that more than one distributor carries a drop-shippable product, the system will give you the ability to switch SKUs and ultimately fulfill from the other distributor via order automation.
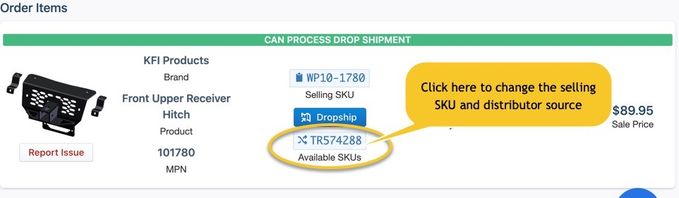
**Email your account manager or customer service to request this feature